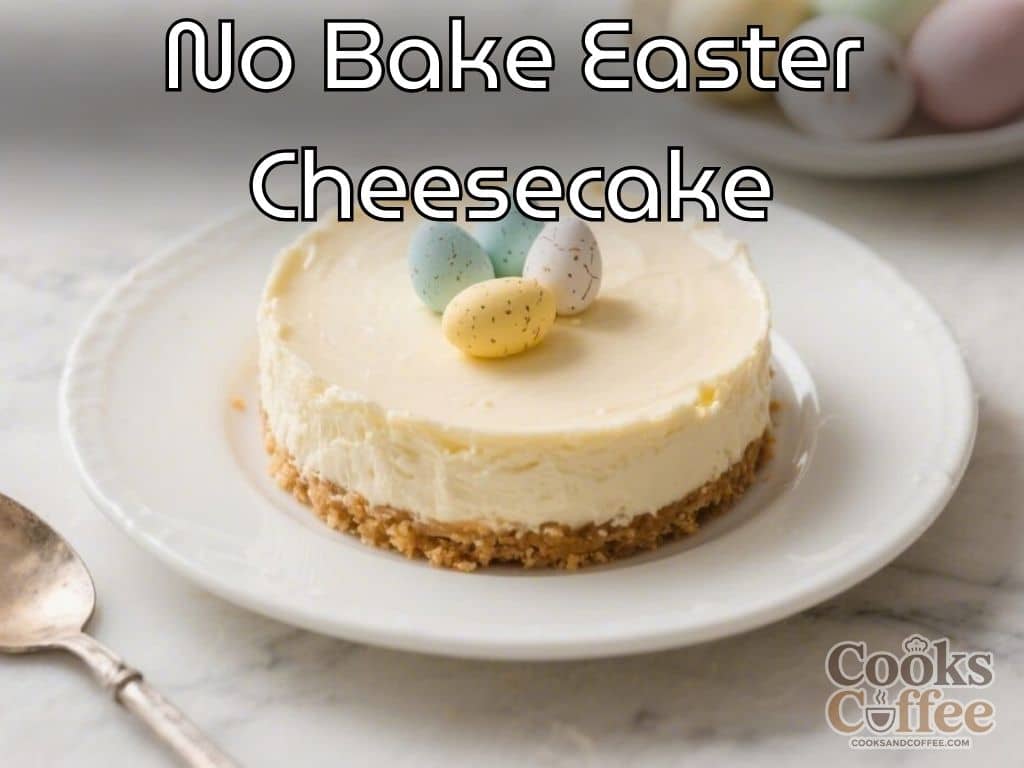
No Bake Easter Cheesecake is the kind of dessert that looks impressive but takes almost no effort. It’s creamy, festive, and doesn’t ask you to turn on the oven. If you’re hosting a brunch or bringing a treat to a family gathering, this cheesecake feels special without the fuss.
The crumbly cookie base, silky filling, and candy topping make it a crowd-pleaser for all ages. Best of all, you can make it ahead and keep your kitchen calm on the day.
What Makes This Special
This cheesecake is all about texture and color. The base is buttery and crisp, the filling is cloud-like and tangy, and the topping brings that playful Easter vibe.
It sets in the fridge, so there’s no guesswork with baking times or cracked tops. You can customize the colors with pastel swirls or keep it simple and white. It’s also a great make-ahead dessert, perfect for busy holiday weekends.
Ingredients
- For the crust:
- 2 cups (200 g) graham cracker or digestive biscuit crumbs
- 1/2 cup (115 g) unsalted butter, melted
- 2 tablespoons granulated sugar (optional, for extra sweetness)
- Pinch of salt
- For the filling:
- 16 oz (450 g) full-fat cream cheese, softened
- 3/4 cup (90 g) powdered sugar
- 1 teaspoon pure vanilla extract
- 1 teaspoon lemon zest (optional) and 1 tablespoon lemon juice
- 1 cup (240 ml) cold heavy whipping cream
- 8 oz (225 g) mascarpone or plain Greek yogurt (optional, for extra lightness)
- For the topping:
- 1 to 1 1/2 cups Easter candies (mini chocolate eggs, pastel M&M’s, or jelly beans)
- Sprinkles (optional)
- Food coloring in pastel shades (optional, for swirl effect)
Instructions
- Prepare the pan. Line the base of a 9-inch (23 cm) springform pan with parchment paper.
Lightly grease the sides for easy release.
- Make the crust. In a bowl, mix the crumbs, melted butter, sugar, and salt until it looks like wet sand. Press firmly into the pan, pushing the crumbs up the sides slightly. Use the bottom of a glass to compact.
Chill for 15 minutes.
- Beat the cream cheese. In a large bowl, beat cream cheese with powdered sugar until smooth and lump-free. Add vanilla, lemon zest, and lemon juice. Mix until creamy.
- Whip the cream. In a separate, cold bowl, whip the heavy cream to stiff peaks.
If using mascarpone, beat it briefly to loosen, then gently fold it into the whipped cream.
- Combine the filling. Fold the whipped cream mixture into the cream cheese mixture in two additions. Be gentle to keep it airy. Taste and adjust sweetness with a little more powdered sugar if you like.
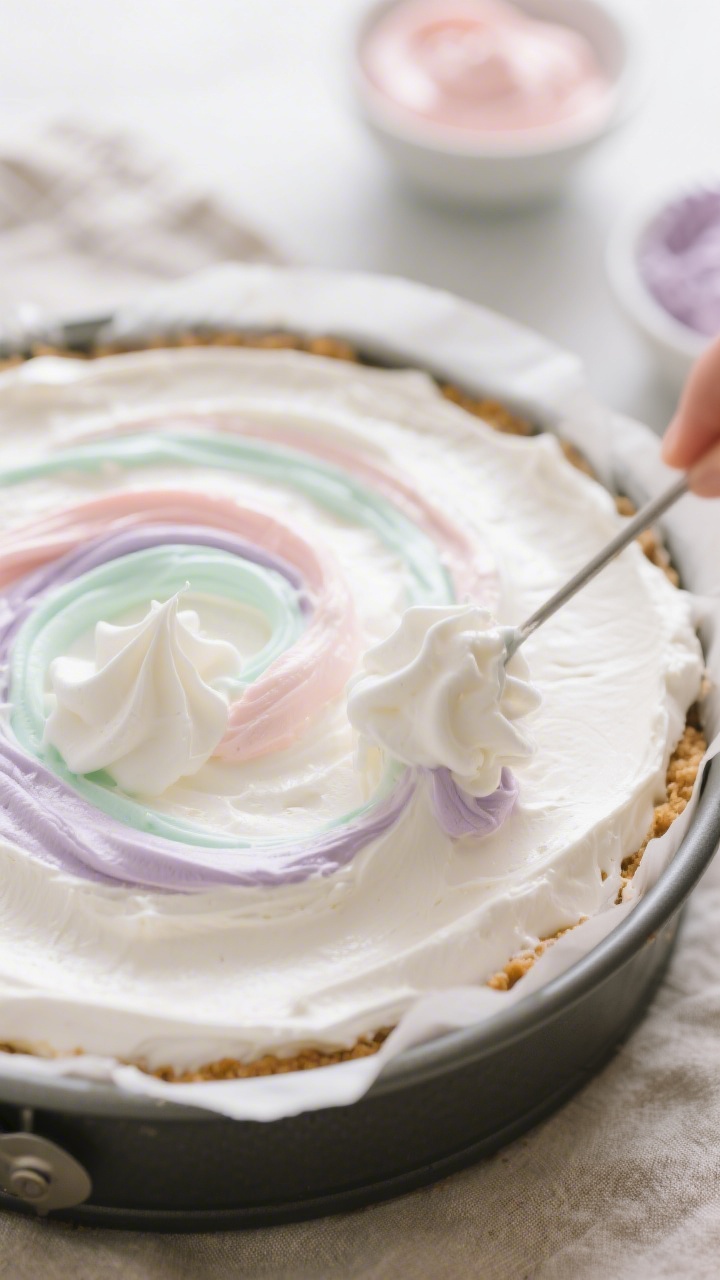
- Add pastel swirls (optional). Divide a cup or two of the filling into small bowls.
Tint with a drop of pastel food coloring. Spoon dollops over the plain filling and swirl lightly with a skewer.
- Assemble and chill. Pour the filling onto the crust. Smooth the top.
Cover and refrigerate for at least 6 hours, or overnight for best set.
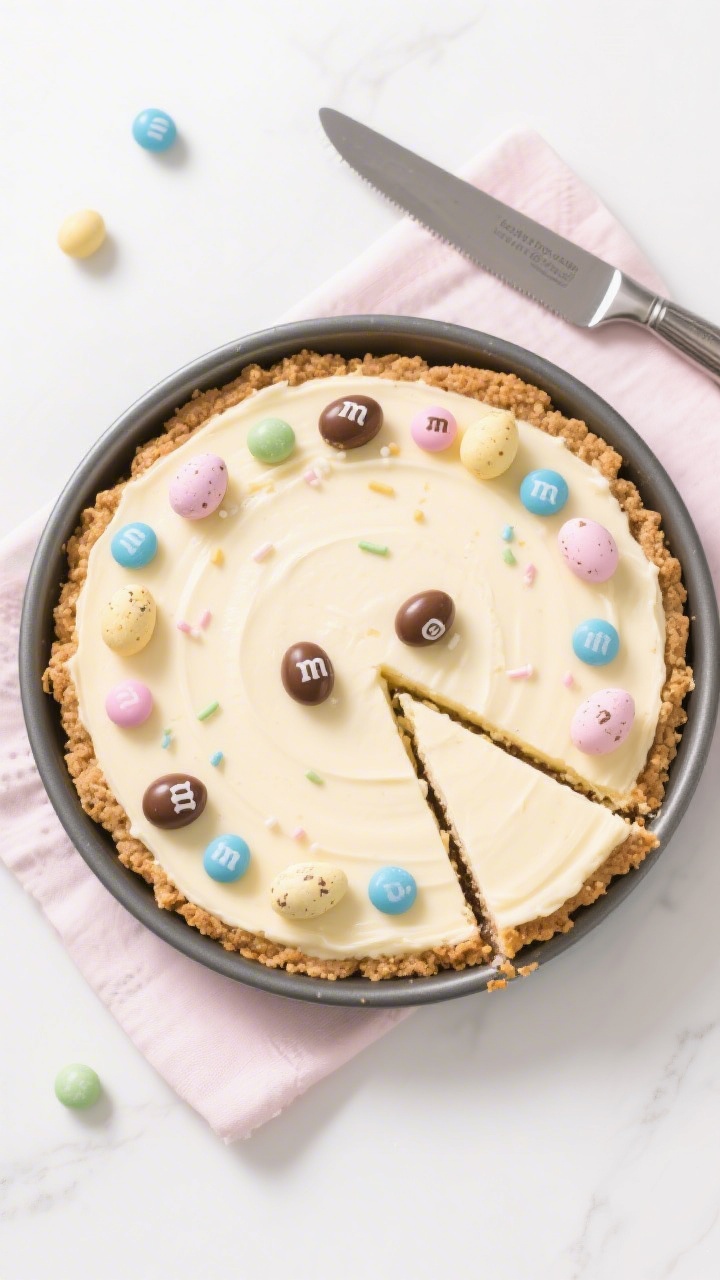
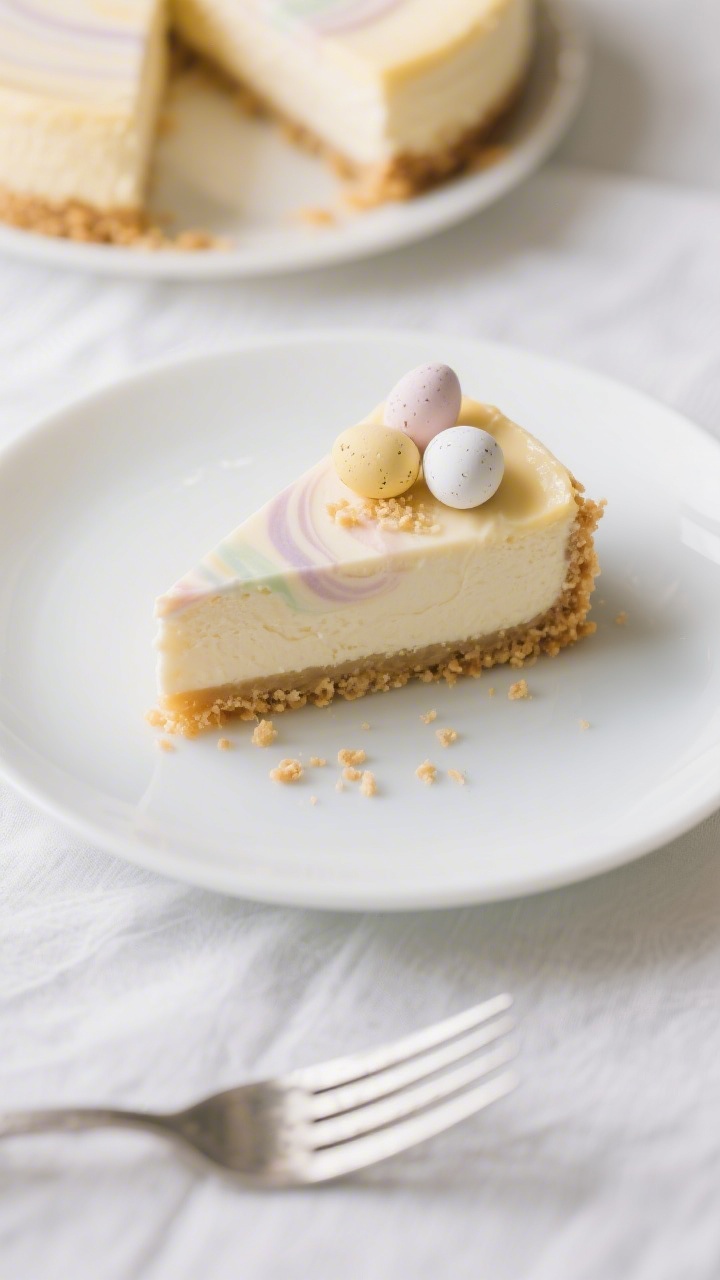
- Add toppings. Just before serving, scatter mini eggs, M&M’s, or jelly beans on top. Add sprinkles for extra cheer. For clean slices, warm a knife under hot water, wipe dry, and cut.
How to Store
- Refrigerator: Cover the cheesecake tightly and store for up to 4 days.
Add candy just before serving so colors don’t bleed.
- Freezer: Freeze the cheesecake (without toppings) for up to 2 months. Wrap the whole pan or individual slices in plastic, then foil. Thaw overnight in the fridge.
- Travel tips: Keep it chilled with ice packs and add toppings at your destination.
Health Benefits
This dessert is a treat, but there are a few bright spots. Protein and calcium from cream cheese, mascarpone, or Greek yogurt help support bones and satiety.
The lemon juice and zest add flavor without extra sugar, which means you can keep the sweetness in check. If you choose Greek yogurt, you also get a bit more protein and less fat. And because it’s no-bake, you avoid extra oils or steps that might add calories.
Common Mistakes to Avoid
- Using low-fat cream cheese. It can make the filling runny.
Full-fat sets better and tastes richer.
- Skipping the chill time. The cheesecake needs at least 6 hours to firm up. Overnight is best for clean slices.
- Overmixing the whipped cream. You want stiff peaks, not butter. Stop as soon as it holds shape.
- Not compacting the crust. A loose crust crumbles apart.
Press it firmly with a flat-bottomed glass.
- Adding candy too early. Some candies bleed color on contact with moisture. Top right before serving.
Alternatives
- Crust swaps: Try chocolate cookie crumbs, shortbread, speculoos, or gluten-free cookies.
- Flavor twists: Add 1/2 cup melted white chocolate to the filling, or fold in 1/2 cup lemon curd for a brighter, tangy version.
- Natural color: Tint pastel swirls with freeze-dried fruit powders (strawberry, blueberry, mango) instead of food coloring.
- Lightened-up version: Replace mascarpone with Greek yogurt and reduce powdered sugar slightly. It will be a bit tangier and softer.
- Mini cheesecakes: Use a muffin pan lined with paper cups.
Press in crust, fill, and chill for 3–4 hours. Great for portion control and easy serving.
- Dairy-free: Use dairy-free cream cheese and coconut whipped cream. Choose vegan cookies for the crust and plant-based butter.
FAQ
Can I make this a day ahead?
Yes.
Making it the day before is ideal. It sets fully and slices cleanly. Just hold off on the candy topping until you’re ready to serve.
Why isn’t my cheesecake firm?
Common reasons include not chilling long enough, using low-fat cream cheese, or overmixing the filling.
Give it more time in the fridge and make sure your cream cheese is full-fat and your whipped cream reached stiff peaks.
Can I reduce the sugar?
You can. Start with 1/2 cup powdered sugar, taste, and add more if needed. Lemon juice and zest help balance flavor so you can keep it less sweet.
What if I don’t have a springform pan?
Use a deep 9-inch pie dish or an 8-inch square pan.
Line with parchment overhanging the sides to lift it out for slicing.
How do I get a super smooth filling?
Beat the cream cheese until completely smooth before adding anything else. Sift the powdered sugar, and fold the whipped cream gently. Room-temperature cream cheese is key.
Will the crust get soggy?
If the crust is well-compacted and chilled before adding the filling, it should stay crisp.
Using a cookie with a bit more fat, like digestive biscuits or grahams with butter, helps prevent sogginess.
Can I use store-bought whipped topping?
Yes, in a pinch. Use about 3 cups and fold it in gently. The texture will be slightly different, but it will still set nicely.
What candies work best on top?
Mini chocolate eggs and candy-coated chocolates hold up well and look festive.
Jelly beans add color but can bleed if they sit too long, so add them right before serving.
Wrapping Up
No Bake Easter Cheesecake is simple to assemble, easy to customize, and perfect for a spring table. With a buttery crust, creamy filling, and a bright candy crown, it brings joy without keeping you stuck in the kitchen. Make it ahead, slice it clean, and watch it disappear.
When a dessert is this effortless and festive, it quickly becomes a holiday favorite.

No Bake Easter Cheesecake – Creamy, Colorful, and Easy
Ingredients
- For the crust:
- 2 cups (200 g) graham cracker or digestive biscuit crumbs
- 1/2 cup (115 g) unsalted butter, melted
- 2 tablespoons granulated sugar (optional, for extra sweetness)
- Pinch of salt
- For the filling:
- 16 oz (450 g) full-fat cream cheese, softened
- 3/4 cup (90 g) powdered sugar
- 1 teaspoon pure vanilla extract
- 1 teaspoon lemon zest (optional) and 1 tablespoon lemon juice
- 1 cup (240 ml) cold heavy whipping cream
- 8 oz (225 g) mascarpone or plain Greek yogurt (optional, for extra lightness)
- For the topping:
- 1 to 1 1/2 cups Easter candies (mini chocolate eggs, pastel M&M’s, or jelly beans)
- Sprinkles (optional)
- Food coloring in pastel shades (optional, for swirl effect)
Instructions
- Prepare the pan. Line the base of a 9-inch (23 cm) springform pan with parchment paper. Lightly grease the sides for easy release.
- Make the crust. In a bowl, mix the crumbs, melted butter, sugar, and salt until it looks like wet sand. Press firmly into the pan, pushing the crumbs up the sides slightly. Use the bottom of a glass to compact. Chill for 15 minutes.
- Beat the cream cheese. In a large bowl, beat cream cheese with powdered sugar until smooth and lump-free. Add vanilla, lemon zest, and lemon juice. Mix until creamy.
- Whip the cream. In a separate, cold bowl, whip the heavy cream to stiff peaks. If using mascarpone, beat it briefly to loosen, then gently fold it into the whipped cream.
- Combine the filling. Fold the whipped cream mixture into the cream cheese mixture in two additions. Be gentle to keep it airy. Taste and adjust sweetness with a little more powdered sugar if you like.
- Add pastel swirls (optional). Divide a cup or two of the filling into small bowls. Tint with a drop of pastel food coloring. Spoon dollops over the plain filling and swirl lightly with a skewer.
- Assemble and chill. Pour the filling onto the crust. Smooth the top. Cover and refrigerate for at least 6 hours, or overnight for best set.
- Add toppings. Just before serving, scatter mini eggs, M&M’s, or jelly beans on top. Add sprinkles for extra cheer. For clean slices, warm a knife under hot water, wipe dry, and cut.