

Juicy Slow Cooker Turkey Breast With Gravy Recipe
The thought of making turkey breast can feel intimidating, especially when you’re worried about ending up with a dry, flavorless slab that tastes like cardboard. But what if I told you that your slow cooker could be your secret weapon for the juiciest, most flavorful turkey breast you’ve ever had?
No babysitting required, no constant basting, just pure set-it-and-forget-it magic. This recipe transforms your crockpot into a turkey-cooking powerhouse, complete with gravy so good you’ll want to drink it straight from the pot (okay, maybe don’t do that, but you get the idea). 🙂
Why Slow Cooker Turkey Breast Is a Game-Changer
Forget everything you thought you knew about cooking turkey. The slow cooker method is honestly one of the most forgiving ways to prepare turkey breast. Because of that low, steady heat, you’ve got way less risk of drying out your bird from overcooking.
Ever had that moment of panic when you realize dinner’s been in the oven too long? With the slow cooker, even if your turkey hangs out for an extra hour or two, it’ll still come out tender and delicious.
Plus, here’s the kicker: those turkey juices that pool at the bottom? They’re liquid gold for making gravy. The slow cooking process pulls out all that flavor, seasoning the broth naturally as it cooks. You’re basically getting a two-for-one deal without any extra work.
Choosing Your Turkey Breast
Bone-in or boneless? Honestly, both work perfectly fine in this recipe. I personally lean toward skin-on turkey breast because the fat under that skin melts while cooking and bastes the meat from the inside out.
It’s like having a self-basting turkey without lifting a finger. Plus, you need that skin if you want to get that gorgeous browned crust that makes everyone at the table go “wow”.
Turkey breasts can vary wildly in size, from a petite 1.5 pounds all the way up to a massive 10-pounder. The beauty of this recipe? It works for any size, as long as it fits in your slow cooker. Just adjust your cooking time accordingly, and you’re golden.
The Ingredients You’ll Need
Let me break down what you need to make this happen. FYI, most of these ingredients are probably already sitting in your pantry 🙂
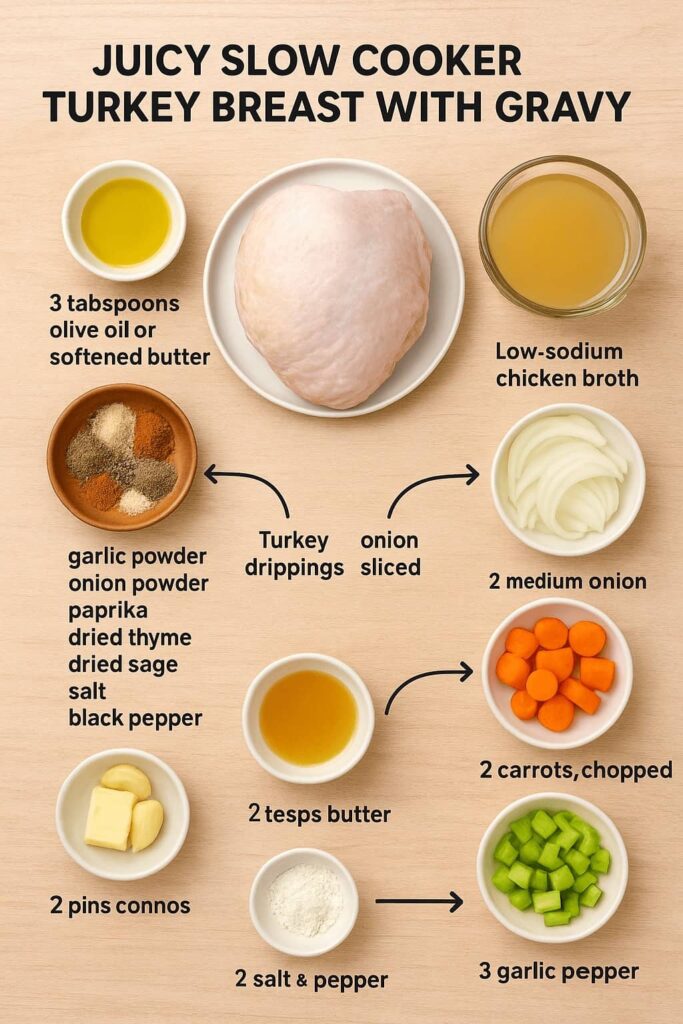
For the turkey:
- 3 to 4-pound turkey breast (boneless or bone-in, skin-on preferred)
- 2 tablespoons olive oil or softened butter
- 1 teaspoon garlic powder
- 1 teaspoon onion powder
- 1 teaspoon paprika
- 1 teaspoon dried thyme
- 1 teaspoon dried sage
- 1 teaspoon salt
- 1/2 teaspoon black pepper
- 1 to 1.5 cups low-sodium chicken broth
- 1 medium onion, sliced
- 2 carrots, chopped
- 2 celery ribs, chopped
- 3 garlic cloves, smashed
For the gravy:
- Turkey drippings from the slow cooker (about 2 cups)
- 2 tablespoons butter
- 2 tablespoons all-purpose flour
- Salt and pepper to taste
How to Prep Your Turkey Like a Pro
First things first: pat that turkey breast dry with paper towels. This step is crucial because you want that spice rub to actually stick to the meat, not slide right off.
If you bought a frozen turkey breast with that mesh netting, leave it on. It keeps everything together and prevents your turkey from falling apart during cooking.
Now for the fun part. Mix all your spices together in a small bowl: garlic powder, onion powder, paprika, thyme, sage, salt, and pepper. This rub is where the magic happens. It doesn’t just season the turkey, it flavors the cooking liquid too, which means your gravy is going to be absolutely killer.
Rub your turkey all over with olive oil or softened butter, then massage that spice blend into every nook and cranny. Get under the skin if you can. Trust me on this one.
Setting Up Your Slow Cooker
Here’s a pro tip that’ll change your turkey game: elevate your turkey breast. Drop those sliced onions, carrots, and celery into the bottom of your slow cooker first. These vegetables act as a natural rack, keeping your turkey from sitting directly in the liquid that’ll accumulate as it cooks. You’ll be amazed at how much liquid a turkey breast releases while cooking. Without that elevation, you’d end up with half your bird poaching instead of roasting, and nobody wants that.
Place your seasoned turkey breast on top of those veggies, then pour in your chicken broth. Toss in those smashed garlic cloves for extra flavor.
The Cooking Process
Pop that lid on and set your slow cooker to low for 4 to 6 hours. The exact time depends on your turkey’s size and your slow cooker’s quirks. A 3 to 4-pound turkey breast typically takes about 4 to 5 hours, while larger breasts might need closer to 6 or 7 hours.
How do you know when it’s done? Simple: grab a meat thermometer and check for an internal temperature of 165°F. That’s the sweet spot for perfectly cooked, juicy turkey without any risk of dryness.
The Secret to Crispy Skin
Okay, here’s where we take things from good to absolutely incredible. Your turkey breast is cooked through and tender, but that skin? It’s pale and, let’s be honest, kind of sad-looking. No worries. Transfer your turkey to a baking dish and stick it under the broiler for just 3 to 5 minutes.
Watch it closely because broilers can go from “golden perfection” to “kitchen fire” real quick. What you want is that crispy, golden-brown skin that crackles when you slice through it. The extra flavor you get from this step is absolutely worth those few extra minutes.
Let It Rest (Seriously, Don’t Skip This)
Pull your turkey out and let it rest for 10 to 15 minutes before slicing. I know you’re hungry and it smells amazing, but this resting period lets all those juices redistribute throughout the meat. If you slice too soon, all that moisture ends up on your cutting board instead of in your turkey. Patience pays off here.
Making That Killer Gravy
While your turkey rests, let’s tackle the gravy. Pour those beautiful drippings from the slow cooker through a fine-mesh strainer into a bowl. You’re straining out the vegetables and any solids, leaving behind pure flavor. You should have about 2 cups of liquid.
In a saucepan over medium heat, melt 2 tablespoons of butter. Once it’s bubbling, whisk in 2 tablespoons of flour to create a roux. Keep whisking for about 1 to 2 minutes until it turns golden brown. This step cooks out that raw flour taste and creates the thickening base for your gravy.
Now gradually whisk in those strained drippings. Pour slowly and keep whisking constantly to avoid lumps. Nobody likes lumpy gravy :/ Let it simmer for 3 to 5 minutes, whisking occasionally, until it thickens to your desired consistency. Taste and adjust with salt and pepper.
Serving Suggestions
Slice that turkey breast against the grain for maximum tenderness. Arrange it on a platter and drizzle some of that gorgeous gravy over the top. The rest? Serve it on the side so everyone can go wild with as much as they want.
This turkey pairs beautifully with classic sides like mashed potatoes, roasted vegetables, stuffing, or a simple green salad. The gravy works wonders on pretty much everything on your plate, so don’t hold back.
Troubleshooting Common Issues
Turkey too dry? Check your cooking time and temperature. Overcooking is the enemy here, even in a slow cooker. Always use a meat thermometer to hit that precise 165°F mark.
Not enough flavor? Make sure you’re using enough seasoning in your rub and don’t skimp on the salt. Also, using skin-on turkey breast makes a huge difference in the flavor department.
Gravy too thin? Let it simmer longer to reduce and thicken naturally. You can also add a slurry of cornstarch and water if you need to speed things up.
Gravy too thick? Whisk in a bit more chicken broth until you reach your preferred consistency.
Storage and Leftovers
Store leftover turkey in an airtight container in the fridge for up to 4 days. The gravy keeps for about the same time. You can also freeze both for up to 3 months. Reheat turkey slices gently in the microwave or in a covered dish in the oven with a splash of broth to prevent drying out.
Leftover turkey is perfect for sandwiches, soups, casseroles, or just eating cold straight from the fridge at midnight (no judgment here). That gravy reheats beautifully and tastes even better the next day after all the flavors have melded together.
Why This Recipe Works Every Time
The slow cooker’s low, gentle heat breaks down the turkey’s connective tissue without drying out the meat. The vegetables and broth create a moist cooking environment that keeps everything tender. The spice rub adds layers of flavor both to the turkey and to the cooking liquid, which becomes your gravy base.
IMO, the biggest advantage is how forgiving this method is. Unlike oven roasting, where timing has to be precise, slow cooking gives you a much wider window of success. Plus, it frees up your oven for other dishes, which is clutch during holiday cooking when oven space is at a premium.
Final Thoughts
Look, turkey breast doesn’t have to be complicated or stressful. With your slow cooker doing all the heavy lifting, you get juicy, flavorful meat with minimal effort and maximum payoff. That gravy? It honestly can save anything (and I mean anything), but with turkey this good, you won’t need saving.
Whether you’re cooking for a small holiday gathering or just want an easy weeknight dinner with killer leftovers, this slow cooker turkey breast recipe delivers every single time.
Give it a shot, and you might never go back to traditional oven-roasted turkey again. And hey, if you do mess something up (which is pretty hard with this method), that gravy’s got your back.
