

Chocolate covered strawberries feel like a small luxury you can make at home in minutes. They look fancy, taste amazing, and work for just about any occasion—from date night to birthdays to a simple weeknight treat. You don’t need a lot of tools or skills to pull this off, just good chocolate and fresh berries.
With a little care, you’ll get a glossy finish, a satisfying snap, and that juicy strawberry center everyone loves.
What Makes This Special
These chocolate covered strawberries balance rich, silky chocolate with bright, fresh fruit. That contrast is what makes them irresistible. They’re also incredibly flexible.
You can keep them classic, add a sprinkle of sea salt, or decorate with nuts, coconut, or a light drizzle. Best of all, they’re quick. From start to finish, you can be done in under 30 minutes, and they require no baking.
What You’ll Need
- Fresh strawberries: Choose firm, ripe berries with bright green tops.
Avoid overly soft or bruised fruit.
- Chocolate: Use high-quality bar chocolate or couverture if you can. Dark, milk, or white all work.
- Optional add-ins for flavor: A pinch of fine sea salt or a splash (1/2 teaspoon) of vanilla or espresso powder.
- Optional toppings: Finely chopped nuts (pistachios, almonds, hazelnuts), shredded coconut, crushed freeze-dried berries, or sprinkles.
- Neutral oil or cocoa butter (optional): 1–2 teaspoons to help thin the chocolate for smoother dipping.
- Tools: Heatproof bowl, small pot (if using a double boiler), parchment paper, baking sheet, paper towels, and a fork or toothpicks for drizzling.
Step-by-Step Instructions

- Pick and prep your strawberries. Choose berries that are dry, firm, and evenly red. Rinse them gently, then dry very well with paper towels. Any moisture will make the chocolate seize or slide off, so let them air-dry completely.
- Line your tray. Place a sheet of parchment paper on a baking sheet or large plate.
This keeps the strawberries from sticking while the chocolate sets.
- Chop the chocolate. Cut the chocolate into small, even pieces. This helps it melt smoothly and evenly without burning.
- Melt the chocolate. Use a double boiler: place the chocolate in a heatproof bowl set over a pot with a little simmering water, making sure the bowl doesn’t touch the water. Stir gently until smooth.
Or microwave in 20–30 second bursts, stirring between each, until melted.
- Adjust consistency if needed. If the chocolate seems thick, stir in 1 teaspoon of neutral oil or cocoa butter. It should flow easily but cling to the berry in a thin, even coat.
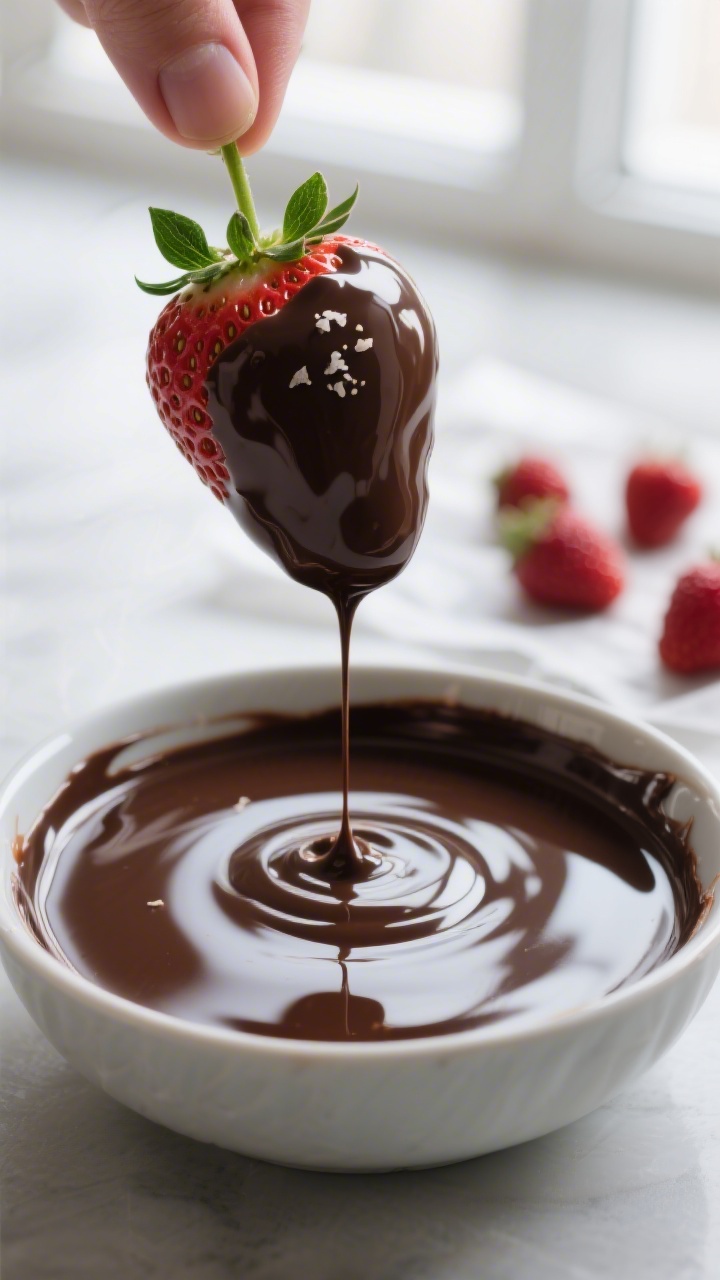
- Dip the strawberries. Hold each berry by the leaves and dip it into the chocolate, swirling for full coverage. Lift and let the excess drip off, then gently scrape the bottom against the bowl’s edge to avoid a big foot of chocolate.
- Set on the tray. Place the dipped berry on the parchment.
Work fairly quickly so the chocolate doesn’t start to firm up in the bowl.
- Add toppings while wet. If using nuts, coconut, or crushed freeze-dried berries, sprinkle them over the chocolate before it sets. Press lightly if needed.
- Optional drizzle. Melt a small amount of contrasting chocolate (white over dark, or dark over white). Use a fork or a piping bag to drizzle thin lines across the set berries for a bakery-style finish.
- Let them set. Leave the tray at cool room temperature for 15–30 minutes.
If your kitchen is warm, refrigerate for about 10–15 minutes, but don’t leave them in the fridge too long or condensation may form.
- Serve fresh. For the best bite—crisp shell, juicy center—enjoy the same day you make them.
How to Store
– Short term: Keep at cool room temperature for up to 6 hours. Avoid direct sun or warm spots. – Overnight: Place in a single layer in an airtight container lined with paper towels. Refrigerate for up to 24 hours.
Let them sit at room temperature for 10–15 minutes before serving to reduce condensation. – Avoid: Stacking berries or covering them before the chocolate is fully set. This causes smudging and sticking.

Health Benefits
– Strawberries: High in vitamin C, fiber, and antioxidants like anthocyanins and ellagic acid. They’re naturally low in calories and support heart health. – Dark chocolate: Offers flavanols that may support circulation and reduce oxidative stress.
Choose 60–70% cocoa for a balance of taste and benefits. – Portion-friendly: A few chocolate covered strawberries can satisfy a sweet tooth with less added sugar than many desserts. – Customizable: You control the ingredients—opt for higher cacao, minimal added oils, and toppings like nuts for healthy fats.
What Not to Do
– Don’t skip drying the berries. Water is the enemy of melted chocolate and prevents proper coating. – Don’t overheat the chocolate. Burnt chocolate turns grainy and bitter. Melt gently and stir often. – Don’t use chocolate chips alone. Many chips contain stabilizers and can melt too thick. If using, add a little oil or mix with bar chocolate. – Don’t refrigerate for hours uncovered. Long, cold storage leads to condensation and streaking. – Don’t rush the set. Freezing can cause cracks and bloom (white streaks).
Use the fridge briefly only if the room is warm.
Recipe Variations
– Classic dark chocolate: Use 70% cocoa and finish with a light sprinkle of flaky sea salt. – Black-and-white: Dip in dark chocolate, then drizzle with white chocolate. Or do the reverse for a fun contrast. – Nut crunch: Roll the wet chocolate in finely chopped pistachios, almonds, or hazelnuts for texture and color. – Coconut kiss: Sprinkle unsweetened shredded coconut while the chocolate is still wet. – Mocha twist: Add 1/2 teaspoon espresso powder to the melted chocolate to deepen the flavor. – Berry-on-berry: Dust with crushed freeze-dried strawberries or raspberries for tart pops of color. – Spiced chocolate: Stir in a pinch of cinnamon and cayenne for a warm, subtle kick.
FAQ
Do I need to temper the chocolate?
Tempering gives you the glossiest finish and best snap, but it’s not required for home treats. If you want an easier route, just melt carefully and serve the same day.
For a more professional look, you can temper by melting two-thirds of the chocolate, removing from heat, then stirring in the remaining third until smooth and slightly thickened.
Why is my chocolate streaky or dull?
This often happens from overheating or from condensation after long refrigeration. Melt low and slow, and minimize time in the fridge. If you need to chill, do it briefly and serve soon after.
Can I use frozen strawberries?
No.
Frozen berries release a lot of moisture as they thaw, which prevents the chocolate from adhering and creates a soggy texture.
What’s the best chocolate to use?
High-quality bar chocolate or couverture melts smoothly and sets with a nice sheen. Choose dark for a rich, less-sweet bite, milk for creaminess, or white for sweetness and contrast. Avoid overly sweet or waxy chocolate.
How far in advance can I make them?
They’re best the day they’re made.
You can make them up to 24 hours ahead and refrigerate in a single layer. Expect a little condensation when you bring them out; gently pat if needed.
How do I keep the leaves looking fresh?
Rinse and dry the berries carefully, including the tops. Avoid prolonged refrigeration and serve soon after setting.
The fresher the berry, the fresher the leaves will look.
My chocolate is too thick. What can I do?
Stir in 1–2 teaspoons of neutral oil or melted cocoa butter to loosen the texture. Warm gently if it has started to cool and thicken.
Can I make them vegan or dairy-free?
Yes.
Use dairy-free dark chocolate or a vegan white chocolate. Always check labels to confirm no milk ingredients are included.
Wrapping Up
Chocolate covered strawberries are simple, beautiful, and endlessly customizable. With dry berries, gently melted chocolate, and a few thoughtful toppings, you’ll get a treat that looks bakery-worthy and tastes even better.
Keep it fresh, don’t overthink it, and enjoy every glossy, juicy bite.

Chocolate Covered Strawberries – Simple, Elegant, and Always a Hit
Instructions
- Pick and prep your strawberries. Choose berries that are dry, firm, and evenly red. Rinse them gently, then dry very well with paper towels. Any moisture will make the chocolate seize or slide off, so let them air-dry completely.
- Line your tray. Place a sheet of parchment paper on a baking sheet or large plate. This keeps the strawberries from sticking while the chocolate sets.
- Chop the chocolate. Cut the chocolate into small, even pieces. This helps it melt smoothly and evenly without burning.
- Melt the chocolate. Use a double boiler: place the chocolate in a heatproof bowl set over a pot with a little simmering water, making sure the bowl doesn’t touch the water. Stir gently until smooth. Or microwave in 20–30 second bursts, stirring between each, until melted.
- Adjust consistency if needed. If the chocolate seems thick, stir in 1 teaspoon of neutral oil or cocoa butter. It should flow easily but cling to the berry in a thin, even coat.
- Dip the strawberries. Hold each berry by the leaves and dip it into the chocolate, swirling for full coverage. Lift and let the excess drip off, then gently scrape the bottom against the bowl’s edge to avoid a big foot of chocolate.
- Set on the tray. Place the dipped berry on the parchment. Work fairly quickly so the chocolate doesn’t start to firm up in the bowl.
- Add toppings while wet. If using nuts, coconut, or crushed freeze-dried berries, sprinkle them over the chocolate before it sets. Press lightly if needed.
- Optional drizzle. Melt a small amount of contrasting chocolate (white over dark, or dark over white). Use a fork or a piping bag to drizzle thin lines across the set berries for a bakery-style finish.
- Let them set. Leave the tray at cool room temperature for 15–30 minutes. If your kitchen is warm, refrigerate for about 10–15 minutes, but don’t leave them in the fridge too long or condensation may form.
- Serve fresh. For the best bite—crisp shell, juicy center—enjoy the same day you make them.