

Easter Fudge is the kind of sweet that makes everyone smile. It’s creamy, cheerful, and full of playful crunch from pastel candies. You don’t need a candy thermometer or special skills, just a few pantry staples and a little patience while it sets.
Whether you’re making it for a spring party, a classroom treat, or a quiet afternoon at home, this recipe delivers bright flavor and fun in every bite.
What Makes This Special
This Easter Fudge is simple to make yet feels festive and polished. You can prepare it in one bowl, customize the mix-ins, and skip the stress of tricky candy-making steps. The base is rich and smooth, while the mini eggs or seasonal M&M’s add color and crunch.
It slices cleanly, packs well, and tastes even better the next day. For gifting, a few squares in a cellophane bag with a ribbon look thoughtful without much effort.
Ingredients
- 3 cups (about 540 g) white chocolate chips (or chopped white baking chocolate)
- 1 can (14 oz/397 g) sweetened condensed milk
- 3 tablespoons unsalted butter, cut into pieces
- 1 teaspoon pure vanilla extract
- 1/4 teaspoon fine sea salt
- 1 to 1 1/2 cups pastel candy mix-ins (mini chocolate eggs, candy-coated chocolates, or sprinkles)
- Optional add-ins: 1/2 cup toasted shredded coconut, 1/2 cup roughly chopped toasted almonds or pistachios, 1/4 teaspoon almond or lemon extract
Step-by-Step Instructions
- Prep the pan. Line an 8-inch (20 cm) square baking pan with parchment, leaving overhang on two sides for easy lifting. Lightly mist with nonstick spray if you like.
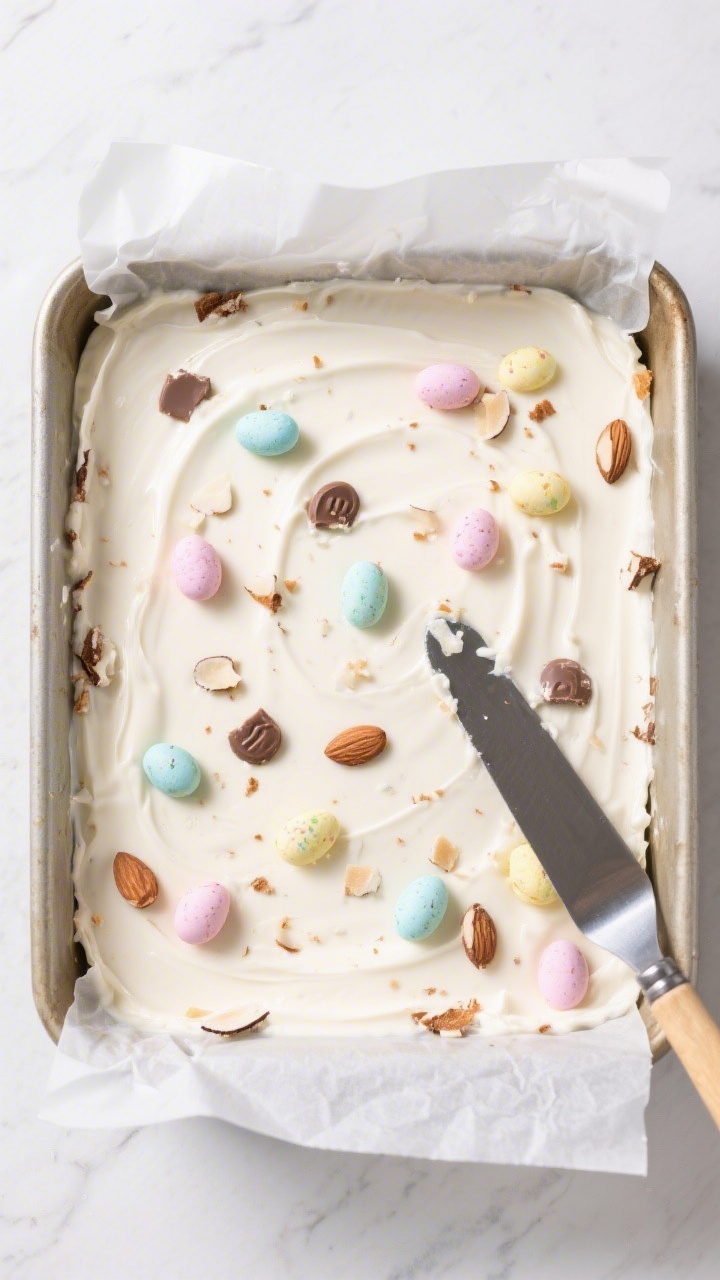
- Set aside some candies. Reserve about 1/3 cup of your mix-ins for sprinkling on top at the end.
Lightly crush any larger candies (like mini eggs) so they slice more easily.
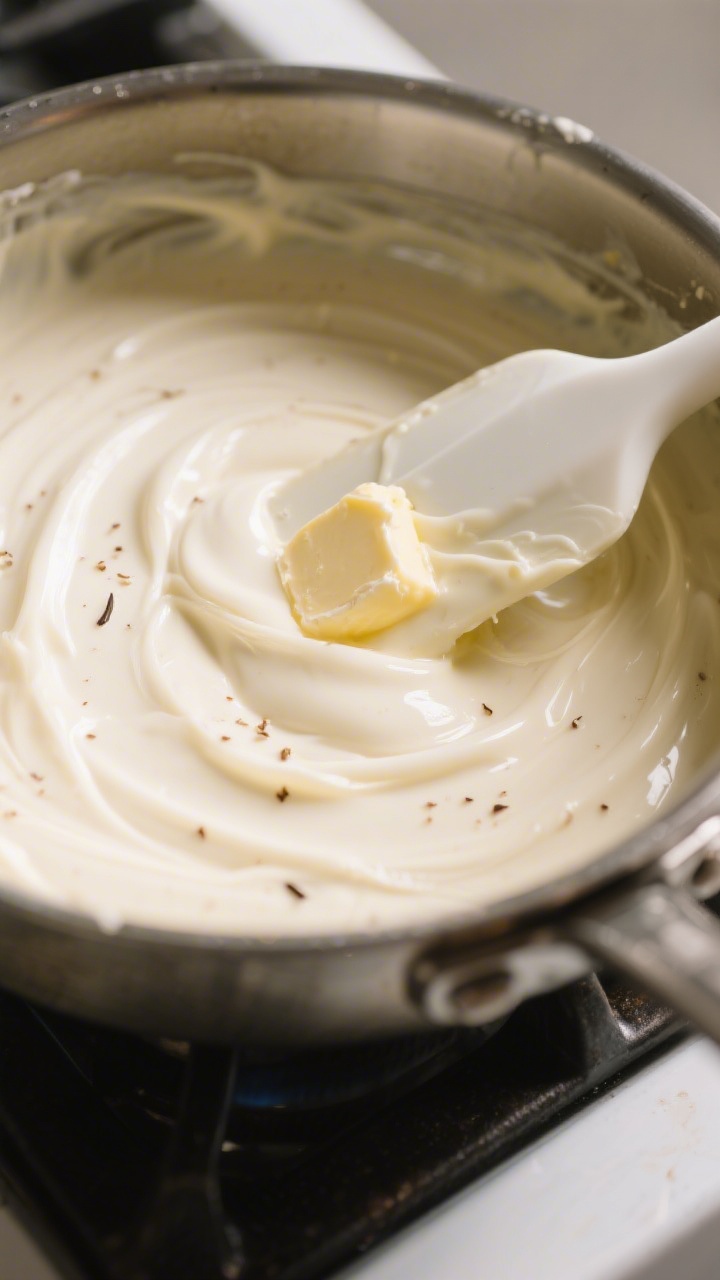
- Melt the base gently. In a medium, heavy-bottomed saucepan, combine white chocolate chips, sweetened condensed milk, and butter. Warm over low heat, stirring constantly, until about 75% melted.
- Finish melting off heat. Remove from heat and keep stirring until completely smooth. This prevents scorching and keeps the fudge silky.
- Add flavor. Stir in vanilla and salt.
Taste a tiny bit (careful, it’s warm) and adjust salt if needed. The mixture should taste sweet with a light, balanced finish.
- Fold in most of the candies. Let the mixture cool for 2–3 minutes so candy coatings don’t melt. Fold in the remaining candies and any optional add-ins.
- Spread and top. Scrape the mixture into the prepared pan.
Smooth the surface with an offset spatula. Sprinkle the reserved candies evenly over the top and gently press them in.
- Chill to set. Refrigerate uncovered for 2–3 hours, or until firm. For clean edges, chill at least 4 hours or overnight.
- Slice. Lift the slab out using the parchment.
Warm a large knife under hot water, wipe it dry, and cut into 25–36 small squares. Clean and re-warm the knife between cuts for neat pieces.
- Serve or gift. Enjoy right away, or pack into airtight containers. Add a note with the date and storage tips if gifting.
How to Store
- Room temperature: Keep in an airtight container at cool room temp for up to 4 days.
Separate layers with parchment to avoid sticking.
- Refrigerator: Store up to 2 weeks for the firmest texture and longest freshness. Let sit 10–15 minutes at room temp before serving for the creamiest bite.
- Freezer: Freeze for up to 2 months. Wrap the uncut slab or tightly wrap portions, then place in a freezer bag.
Thaw overnight in the fridge before slicing.

Health Benefits
While fudge is an indulgence, there are a few small wins worth noting. White chocolate contains dairy, which offers calcium for bones and teeth. Nuts, if you add them, provide healthy fats, a bit of protein, and some fiber.
Darker chocolate mix-ins (if you swap some in) can offer antioxidants. That said, this is a treat: enjoy mindful portions, pair with fresh fruit on a dessert plate, and savor slowly.
Pitfalls to Watch Out For
- Overheating the chocolate: White chocolate scorches fast. Keep heat low and pull off the burner while some bits are still melting.
- Adding candies too soon: If the base is piping hot, candy coatings can bleed color and melt.
Let it cool a few minutes before folding in.
- Skipping the salt: A pinch of salt sharpens flavor and keeps the sweetness from feeling flat.
- Cutting before it sets: Warm or soft fudge will smear. Chill completely for clean, bakery-style squares.
- Using the wrong pan size: A larger pan makes thin, brittle pieces. Stick to an 8-inch square for ideal thickness.
Recipe Variations
- Lemon Confetti Fudge: Add 1/2 teaspoon lemon extract and the zest of 1 lemon.
Fold in pastel sprinkles instead of candy-coated chocolates.
- Cookies and Cream Easter Fudge: Stir in 1 cup crushed sandwich cookies and 1/2 cup pastel chocolates. The cookie crunch balances the creamy base.
- Toasted Coconut Nest: Fold in 1/2 cup toasted shredded coconut. Press a few chocolate eggs on top of each square after slicing for a “nest” look.
- Almond Crunch: Add 1/4 teaspoon almond extract and 1/2 cup chopped toasted almonds.
Sprinkle with a pinch of flaky salt before chilling.
- Marbled Fudge: Melt 1/2 cup semisweet chocolate separately. Pour the white fudge into the pan, then drizzle the semisweet over top and swirl with a skewer.
FAQ
Can I use milk or dark chocolate instead of white?
Yes. The method is the same, but the flavor will be richer and a bit less sweet.
If using darker chocolate, you can reduce the salt slightly and consider adding an extra teaspoon of butter for an ultra-smooth finish.
What if my fudge is grainy?
Graininess usually means the chocolate overheated. Next time, melt more gently and finish melting off the heat. If it’s only slightly grainy, pressing the mixture firmly into the pan and letting it set can still yield a decent texture.
Can I make this in the microwave?
Yes.
Combine white chocolate, condensed milk, and butter in a large microwave-safe bowl. Heat at 50% power in 20–30 second bursts, stirring between each, until smooth. Add vanilla, salt, and mix-ins, then proceed as directed.
Is there a dairy-free version?
Use dairy-free white chocolate chips and sweetened condensed coconut milk.
Swap in a plant-based butter. The set will be slightly softer but still sliceable and delicious.
Why won’t my fudge firm up?
Common reasons include warm room temperature, measuring errors, or too much add-in volume. Chill longer, even overnight.
If it still won’t set, freeze for 30 minutes, then cut and store the pieces in the fridge.
How far in advance can I make it?
You can make Easter Fudge up to two weeks ahead and refrigerate it in an airtight container. For best presentation, add any delicate sprinkles right before serving so the colors stay bright.
What’s the best way to get clean cuts?
Refrigerate until very firm, then use a large chef’s knife warmed under hot water and wiped dry. Cut straight down rather than sawing, and clean the blade between slices.
In Conclusion
Easter Fudge is the easy, colorful treat that checks every box: quick to make, endlessly customizable, and guaranteed to bring a little joy to the table.
With a creamy base and crunchy, pastel mix-ins, it looks festive without a lot of fuss. Make a pan for a party, pack it up for gifts, or stash a few squares for yourself. It’s the kind of simple recipe you’ll turn to every spring—and maybe a few times in between.

Easter Fudge – A Colorful, Crowd-Pleasing Treat
Ingredients
- 3 cups (about 540 g) white chocolate chips (or chopped white baking chocolate)
- 1 can (14 oz/397 g) sweetened condensed milk
- 3 tablespoons unsalted butter, cut into pieces
- 1 teaspoon pure vanilla extract
- 1/4 teaspoon fine sea salt
- 1 to 1 1/2 cups pastel candy mix-ins (mini chocolate eggs, candy-coated chocolates, or sprinkles)
- Optional add-ins: 1/2 cup toasted shredded coconut, 1/2 cup roughly chopped toasted almonds or pistachios, 1/4 teaspoon almond or lemon extract
Instructions
- Prep the pan. Line an 8-inch (20 cm) square baking pan with parchment, leaving overhang on two sides for easy lifting. Lightly mist with nonstick spray if you like.
- Set aside some candies. Reserve about 1/3 cup of your mix-ins for sprinkling on top at the end. Lightly crush any larger candies (like mini eggs) so they slice more easily.
- Melt the base gently. In a medium, heavy-bottomed saucepan, combine white chocolate chips, sweetened condensed milk, and butter. Warm over low heat, stirring constantly, until about 75% melted.
- Finish melting off heat. Remove from heat and keep stirring until completely smooth. This prevents scorching and keeps the fudge silky.
- Add flavor. Stir in vanilla and salt. Taste a tiny bit (careful, it’s warm) and adjust salt if needed. The mixture should taste sweet with a light, balanced finish.
- Fold in most of the candies. Let the mixture cool for 2–3 minutes so candy coatings don’t melt. Fold in the remaining candies and any optional add-ins.
- Spread and top. Scrape the mixture into the prepared pan. Smooth the surface with an offset spatula. Sprinkle the reserved candies evenly over the top and gently press them in.
- Chill to set. Refrigerate uncovered for 2–3 hours, or until firm. For clean edges, chill at least 4 hours or overnight.
- Slice. Lift the slab out using the parchment. Warm a large knife under hot water, wipe it dry, and cut into 25–36 small squares. Clean and re-warm the knife between cuts for neat pieces.
- Serve or gift. Enjoy right away, or pack into airtight containers. Add a note with the date and storage tips if gifting.