
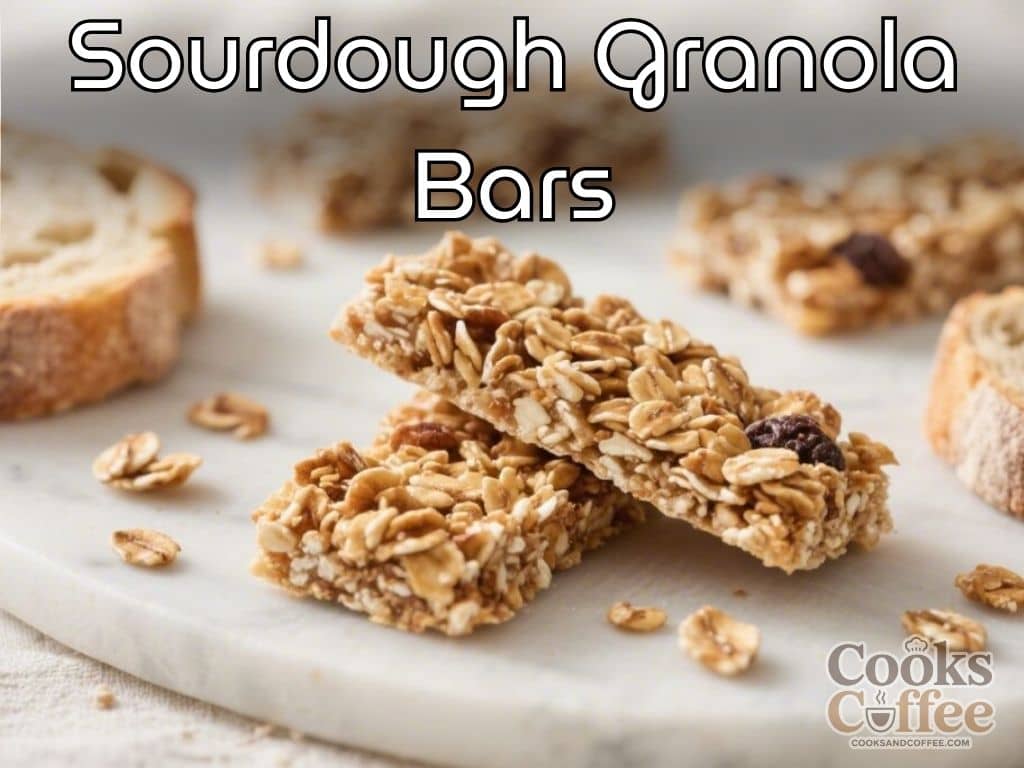
If you keep a sourdough starter, you know the joy and the struggle: it’s alive, it’s hungry, and you’re always looking for ways to use the discard. These sourdough granola bars are a smart, tasty answer. They’re chewy, lightly crisp at the edges, and packed with oats, nuts, and just enough sweetness.
The sourdough adds a gentle tang and helps everything bind without getting dry. Make a pan on Sunday, and you’ve got grab-and-go snacks all week.
What Makes This Recipe So Good

- Uses Up Sourdough Discard: No more tossing good starter. The discard adds flavor and helps create that chewy, bakery-style texture.
- Customizable: Swap in your favorite nuts, seeds, or dried fruit.
Keep it nut-free or go heavy on chocolate—your call.
- Perfect Texture: Soft-chewy center with a toasty top. Bake a little longer for crunchier bars, or keep them softer for kids’ lunchboxes.
- Wholesome Ingredients: Whole oats, natural sweeteners, and healthy fats make these feel like a treat without the sugar crash.
- Make-Ahead Friendly: They store well and freeze beautifully for quick snacks or breakfast on the run.
Ingredients
- 2 cups old-fashioned rolled oats
- 1/2 cup raw nuts (almonds, walnuts, pecans), chopped
- 1/4 cup seeds (pumpkin or sunflower)
- 1/2 cup unsweetened shredded coconut (optional but great for texture)
- 1/3 cup dried fruit (raisins, cranberries, chopped apricots, or dates)
- 1/3 cup dark chocolate chips or chopped chocolate (optional)
- 3/4 cup sourdough starter discard (100% hydration), unfed and at room temp
- 1/3 cup honey or maple syrup
- 1/4 cup brown sugar or coconut sugar (optional for sweeter bars)
- 1/3 cup nut butter or seed butter (peanut, almond, tahini, or sunflower seed)
- 1/4 cup neutral oil or melted coconut oil
- 1 large egg (or 1 flax egg: 1 tbsp ground flax + 3 tbsp water, rested 5 minutes)
- 1 tsp vanilla extract
- 1/2 tsp fine sea salt
- 1/2 tsp ground cinnamon
- 1/2 tsp baking soda
Step-by-Step Instructions

- Prep the pan: Heat the oven to 350°F (175°C). Line an 8×8-inch pan with parchment, letting it overhang for easy lifting.
Lightly grease the sides.
- Toast the dry mix: On a sheet pan, spread the oats, nuts, seeds, and coconut. Toast for 8–10 minutes, stirring once, until lightly golden and fragrant. Let cool slightly.
- Whisk the wet ingredients: In a large bowl, whisk the sourdough discard, honey or maple, brown sugar (if using), nut butter, oil, egg, and vanilla until smooth and glossy.
- Add the seasonings: Whisk in the salt, cinnamon, and baking soda.
This keeps the flavor balanced and helps the bars set.
- Combine: Add the toasted oat mixture to the bowl and stir until every oat is coated. Fold in the dried fruit and chocolate (if using). The mixture should be thick and sticky.
- Press firmly: Scrape the mixture into the prepared pan.
Use a spatula or the bottom of a measuring cup to press it down very firmly, especially into the corners. A tight pack equals tidy slices.
- Bake: Bake for 20–25 minutes, until the top is set and lightly browned at the edges. For crisper bars, go up to 28 minutes; for chewier, pull them earlier.
- Cool completely: Place the pan on a rack and cool fully, at least 1 hour.
Don’t rush this step—cooling helps the bars firm up.
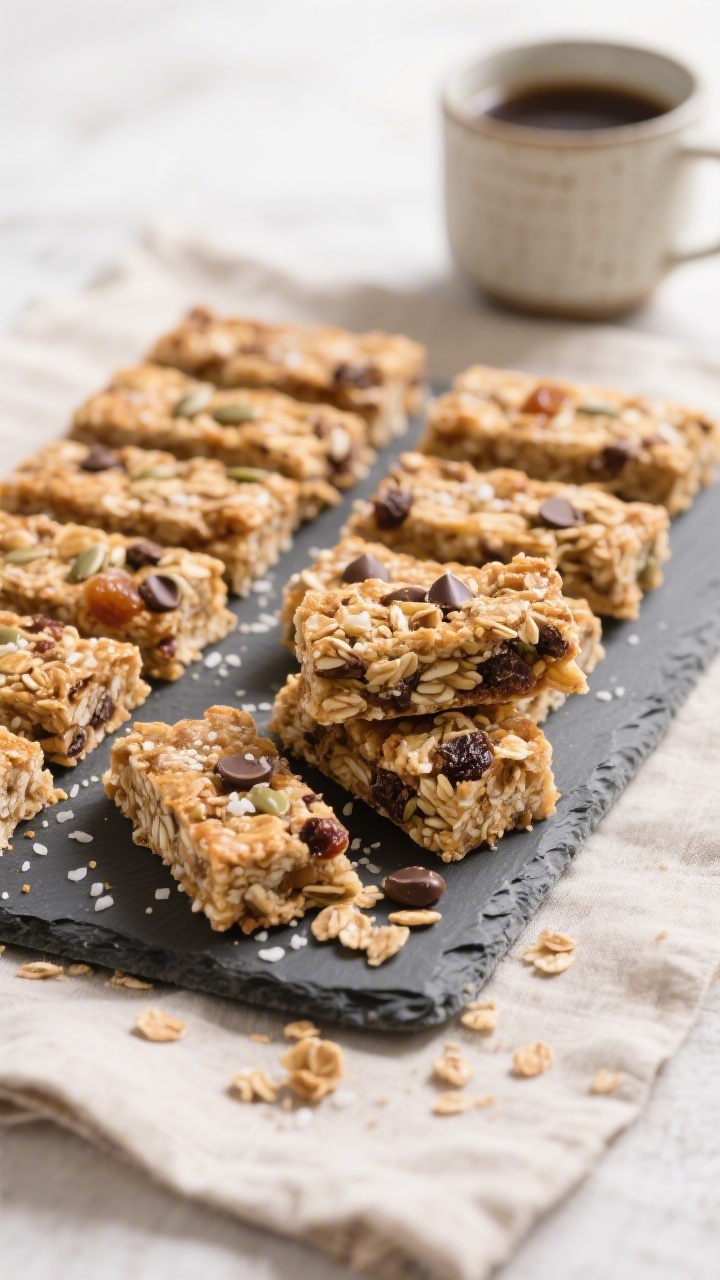
- Slice: Lift out using the parchment and cut into 12–16 bars with a sharp knife. Wipe the blade between cuts for clean edges.
Keeping It Fresh
- Room temp: Store in an airtight container for 4–5 days. Slip a piece of parchment between layers to prevent sticking.
- Fridge: Keeps up to 10 days.
The bars firm up when cold; let them sit for a few minutes before eating if you like them softer.
- Freezer: Freeze individually wrapped bars for up to 2 months. Thaw at room temp for 30 minutes or warm briefly in the microwave.
Benefits of This Recipe
- Reduces Food Waste: Sourdough discard finds a tasty purpose instead of going down the drain.
- Steady Energy: Oats, nuts, and seeds offer fiber and healthy fats for longer-lasting fuel.
- Lower Sugar Options: You can keep them mildly sweet by using just honey or maple and skipping the extra sugar.
- Meal-Prep Friendly: One pan makes a week’s worth of snacks, lunchbox sides, or pre-workout bites.
- Kid-Approved Flavors: The gentle tang from the starter pairs well with chocolate, cinnamon, and vanilla.
What Not to Do
- Don’t skip toasting the dry mix: It adds deep, nutty flavor and improves crunch. Raw oats can taste flat.
- Don’t under-pack the pan: Loose mixture leads to crumbly, messy bars.
Press them down hard.
- Don’t overbake: Dry, hard bars happen fast. Start checking at 20 minutes and look for light browning at the edges.
- Don’t cut while warm: Warm bars fall apart. Let them cool completely for clean slices.
- Don’t overload sticky add-ins: Too many chocolate chips or dried fruits can stop the bars from setting.
Stick to the amounts listed.
Variations You Can Try
- Nut-Free Crunch: Use sunflower and pumpkin seeds, plus tahini or sunflower seed butter. Add a sprinkle of sesame seeds for extra depth.
- Trail Mix Bars: Mix chopped peanuts, pretzel bits, raisins, and chocolate chunks. A pinch of flaky salt on top is perfect.
- Tropical Twist: Dried pineapple, mango, coconut flakes, and macadamia nuts.
Swap cinnamon for a little ground ginger.
- Mocha Chip: Add 1 tbsp instant espresso powder and use dark chocolate chips. A little extra vanilla rounds it out.
- Apple Pie: Use chopped dried apples, add 1/4 tsp nutmeg, and drizzle with a light glaze after baking if you like.
- High-Protein Boost: Stir in 2–3 tbsp hemp hearts or a scoop of unflavored or vanilla protein powder. If the mixture gets too dry, add 1–2 tbsp extra sourdough discard.
FAQ
Can I use active sourdough starter instead of discard?
Yes.
Active starter works the same here. The bars may rise a touch more and taste slightly lighter, but the difference is small.
Do I need the egg?
No. A flax egg binds well: mix 1 tbsp ground flax with 3 tbsp water and rest 5 minutes.
The bars will be a bit softer but still hold together if well packed.
Can I use quick oats?
You can, but the bars may be denser and less textured. If using quick oats, watch the bake time and check early—they can brown faster.
How do I make them less sweet?
Use only honey or maple and skip the brown sugar. You can also reduce the chocolate and choose tart dried fruit like cranberries or unsweetened cherries.
Why did my bars crumble?
Common reasons: not packing the mixture firmly, cutting while warm, or skimping on the binder (nut butter, sweetener, or egg).
Measure carefully and press hard into the pan.
Can I double the recipe?
Yes. Use a 9×13-inch pan and add a few minutes to the bake time. Make sure to press the mixture firmly to keep slices neat.
Is the sourdough flavor strong?
It’s subtle.
Expect a mild tang that balances the sweetness without tasting overtly “sour.”
Are these gluten-free?
Use certified gluten-free oats and ensure your starter is fed with gluten-free flour. Note that textures vary with GF starters; you may need an extra tablespoon of nut butter.
In Conclusion
Sourdough granola bars turn everyday pantry staples and a bit of discard into something you’ll actually look forward to eating. They’re easy to customize, simple to store, and sturdy enough to toss in a bag.
Keep the steps straightforward—toast, mix, press, bake, cool—and you’ll get reliable results every time. Make a batch once, and they’ll become a regular in your snack rotation.

Sourdough Granola Bars – Chewy, Toasty, and Perfect for Snacking
Ingredients
- 2 cups old-fashioned rolled oats
- 1/2 cup raw nuts (almonds, walnuts, pecans), chopped
- 1/4 cup seeds (pumpkin or sunflower)
- 1/2 cup unsweetened shredded coconut (optional but great for texture)
- 1/3 cup dried fruit (raisins, cranberries, chopped apricots, or dates)
- 1/3 cup dark chocolate chips or chopped chocolate (optional)
- 3/4 cup sourdough starter discard (100% hydration), unfed and at room temp
- 1/3 cup honey or maple syrup
- 1/4 cup brown sugar or coconut sugar (optional for sweeter bars)
- 1/3 cup nut butter or seed butter (peanut, almond, tahini, or sunflower seed)
- 1/4 cup neutral oil or melted coconut oil
- 1 large egg (or 1 flax egg: 1 tbsp ground flax + 3 tbsp water, rested 5 minutes)
- 1 tsp vanilla extract
- 1/2 tsp fine sea salt
- 1/2 tsp ground cinnamon
- 1/2 tsp baking soda
Instructions
- Prep the pan: Heat the oven to 350°F (175°C). Line an 8×8-inch pan with parchment, letting it overhang for easy lifting. Lightly grease the sides.
- Toast the dry mix: On a sheet pan, spread the oats, nuts, seeds, and coconut. Toast for 8–10 minutes, stirring once, until lightly golden and fragrant. Let cool slightly.
- Whisk the wet ingredients: In a large bowl, whisk the sourdough discard, honey or maple, brown sugar (if using), nut butter, oil, egg, and vanilla until smooth and glossy.
- Add the seasonings: Whisk in the salt, cinnamon, and baking soda. This keeps the flavor balanced and helps the bars set.
- Combine: Add the toasted oat mixture to the bowl and stir until every oat is coated. Fold in the dried fruit and chocolate (if using). The mixture should be thick and sticky.
- Press firmly: Scrape the mixture into the prepared pan. Use a spatula or the bottom of a measuring cup to press it down very firmly, especially into the corners. A tight pack equals tidy slices.
- Bake: Bake for 20–25 minutes, until the top is set and lightly browned at the edges. For crisper bars, go up to 28 minutes; for chewier, pull them earlier.
- Cool completely: Place the pan on a rack and cool fully, at least 1 hour. Don’t rush this step—cooling helps the bars firm up.
- Slice: Lift out using the parchment and cut into 12–16 bars with a sharp knife. Wipe the blade between cuts for clean edges.


